Running Time – React Native Sample Application

Open sources GitHub. Install App from Play Market.

Not so long ago I created a simple running tracker – Running Time that was build on Laravel and Vue as a tutorial to build Single Page Applications. It turned out to be quite helpful learning app for many people. Now I decided to get to know React Native a bit more and in the process I created an app that uses that same Laravel API backend.

This mobile App is quite simple it has authentication flow with register and login pages. Main screen with three tabs, “Dashboard”, “Entries” and “Profile”.

Here is more detailed list of features:

  • Simple and clean code
  • Redux with redux-thunk
  • Auth flow: login and registration
  • Dashboard tab with panels and charts
  • Entries list tab
  • Add / edit entry
  • Infinite scroll
  • Pull to refresh
  • Profile tab: update profile

The app is free to use and modify in any way and has MIT license.

Open sources GitHub. Install App from Play Market.

Laravel Shortcodes

WordPress based Shortcodes for Laravel 5.x with shared variables, debugbar integration, flexible configuration and other useful features.

Github: https://github.com/vedmant/laravel-shortcodes

Build powerful and simple layouts using shortcodes in the content or views like this:

[b]Bold text[/b]
[row]
  [col md=8]
     [posts_list types="post,gallery" show_tags="yes"]
  [/col]
  [col md=4]
     [poll id="1"]
     [user_info username="test_user" website="mywebsite.com" active="yes"]
     [last_free_post title="Free Posts"]
  [/col]
[/row]

Installation

Via Composer

$ composer require vedmant/laravel-shortcodes

This package supports Laravel Auto-Discover and will be discovered automatically.

For Laravel version before 5.5 please add the Vedmant\LaravelShortcodes\LaravelShortcodesServiceProvider::class to the providers array in config/app.php. And optionally ‘Shortcodes’ => Vedmant\LaravelShortcodes\Facades\Shortcodes::class, to aliases.

Configuraton

Publish configuration.

php artisan vendor:publish --tag=shortcodes

Usage

Shortcode class

Shortcode class should extend abstract \Vedmant\LaravelShortcodes\Shortcode class.

This packages adds make:shortcode artisan command:

php artisan make:shortcode PostsListShortcode

It will generate a shortcode class in the app/Shortcodes folder by default.

Register shortcodes

You can use AppServiceProvider boot method to register all needed shortcodes.

Using shortcode class:

Shortcodes::add('b', BShortcode::class);

Using shortcode classes in array, preferable for lots of shortcodes:

Shortcodes::add([
   'a' => AShortcode::class,
   'b' => BShortcode::class,
]);

Using closure:

Shortcodes::add('test', function ($atts, $content, $tag, $manager) {
   return new HtmlString('<strong>some test shortcode</strong>');
});

Rendering shortcodes

By default this packages extends View to parse all shortcodes during views rendering. This feature can be disabled in the config file.

Also to enable / disable rendering shortcodes for specific view you can use:

view('some-view')->withShortcodes(); // Or view('some-view')->withoutShortcodes();

To render shortcodes manually use:

{{ Shortcodes::render('[b]bold[/b]') }}

Shared attributes

YOccasionally, you may need to share a piece of data with all shortcodes that are rendered by your application. You may do so using the shortode facade’s share method. Typically, you should place calls to share in the controller, or within a service provider’s boot method.

Shortcodes::share('post', $post);

Then you can get share attributes in the shortcode class:

$post = $this->shared('post'); $allShared = $this->shared();

Comma separated values (array attributes)

If you need to pass an array to a shortcode, you can pass values separated by comma:

[posts_list ids="1,2,3"]

Then in render function you can parse this attribute using build in method:

$ids = $this->parseCommaSeparated($atts['ids']);

Edit configuration file as needed.

Integration with Laravel Debugbar

This packages supports Laravel Debugbar. Integration can be disabled in the config file if needed.

This project is fully free to use for any purpose and licensed under MIT License.

My Little Bitcoin – simple cryptocurrency implementation on JavaScript with GUI

I was interested in Bitcoin and Blockchain technologies for a while and in theory things look pretty simple yet so powerful. I really admire genius of Satoshi Nakamoto or whoever invented Blockchain based Crypto Currency and eventually I decided to implement my own simple cryptocurrency to study it better, as for me the best way to learn is to do it myself.

And the result is My Little Bitcoin – a simple cryptocurrency implementation on JavaScript in just about 650 lines of code (without comments and client). It also includes WEB GUI written on Vue.js where you can send coins and explore blockchain.

The structure

The project is based on Node.js and has following basic structure:

  1. Library – consist of functions to help handle crypto currency in a simplest way
  2. Store – this in-memory storage for blockchain, wallets, mempool and few other things
  3. Miner – this a worker that adds new blocks to the chain
  4. Peers – simple peer-to-peer blockchain synchronization implementation
  5. Server – web server that serves data for our front end GUI, includes API and web sockets

The chain

The structure of the chain is the simplest possible.

Block structure is following:

{
  index, // Block index
  prevHash, // Hash of the previous block
  time, // Current block timestamp
  transactions, // List of transactions, included into the block
  nonce, // Nonce, required for proof of work protocol
  hash, // Current block hash
}

Transaction structure is following:

{
  id, // Transaction unique id
  time, // Transaction timestamp
  hash, // Transaction hash
  reward, // Boolean to mark mining reward transaction
  inputs, // List of inputs in the transaction
  outputs, // List of outputs in transaction
  address, // Transaction is limited to only one input address for simplicity
  hash, // Transaction hash
  signature, // Transaction hash signature
}

And following inputs and outputs structure:

// Input
{
  tx, // Points to transaction of referenced output
  index, // Index of the output in the referenced transaction
  amount, // Amount of the referenced output
  address, // Address of the referenced output and also public key
  signature, // Signature, signed by private key and can be verified by included public key
}
// Output
{
  index, // Output index in current transaction
  amount, // Amount of the output
  address, // Address of the wallet (public key)
}

For demo purpose I created special mode that disables peer-to-peer module, reduces proof of work difficulty and adds one minute block timeout.

Demo

Check sources here: GitHub Link

This implementation is pretty naive and suitable only for studying purpose.

This project is fully free to use for any purpose and licensed under MIT License.

How to setup Node.js production application on Apache multiple virtual host server

When it comes to using Node.js on backend it’s quite different from what people used to do for PHP server configuration.

Process manager

First and most important is not to run your application directly with node app.js command instead use one of the following packages: forever, PM2, and some others. This will help maintain your Node application process and restart it if it crashes.

My own pick is PM2 as it’s the most popular and has lots of features, great app monitoring, easy installations and usage.

Installation is quite simple, just using npm or yarn package managers. You probably will install it globally under root user so it can be accessible for all server users.

[root@theserver ~]$ npm -g install pm2 
# Or
[root@theserver ~]$ yarn global add pm2 

Then switch to the user, your virtual host will be using, let’s call it theproject, and run pm2 startup

[theproject@theserver ~]$ pm2 startup

It will respond with a message like this:
[PM2] Init System found: systemd
[PM2] To setup the Startup Script, copy/paste the following command:

It will require to run command with root privileges, using sudo user or root user directly:

[root@theserver ~]$ <the command from pm2 startup here>

If everything is successful it will add a PM2 service that will run on the system boot under your user theproject. It’s not recommended to install pm2 pm2 startup under the root user directly as it will run all your application scripts under root user as well.

Then you will need to add PM2 process configuration file, it supports json, js, yaml formats, here is the simplest example, process.yaml file:

apps:
  - name: theproject
    script: app.js
    exec_mode: fork

Check more info about process file here.

To run your application, cd to your project folder, and run pm2 start process.yml

[theproject@theserver ~]$ cd theproject
[theproject@theserver theproject]$ pm2 start process.yml

It will start your application and print current status table.

To make sure your app will start again after server restart, run:

[theproject@theserver theproject]$ pm2 save

You can nicely monitor your app using command pm2 monit, check current list of apps pm2 list and view last log records pm2 logs. To get further insights into your app, go to https://keymetrics.io/ setup account and follow instructions, the functionality is really awesome and must have for any production project.

Apache configuration

When our app is up and running on server we actually need to access it somehow using our domain name and 80 port, yet our app is running on some port like 3000 and is available only on 127.0.0.1 (localhost) ip (if not, it might be a security issue).

On 80 port we already have Apache running, so we can use Apache as a reverse proxy for our application. For you you will need to make sure Apache has mod_proxy installed and enabled.

Apache Virtual host configuration will be following:

<VirtualHost *:80>
  ServerName theproject.com
  ServerAlias www.theproject.com
  ErrorLog /home/theproject/logs/error_log
  CustomLog /home/theproject/logs/access_log combined

  ProxyRequests Off
  ProxyPreserveHost On

  ProxyPass / http://localhost:3000/
  ProxyPassReverse / http://localhost:3000/

  # This is needed only if you want to use web sockets
  RewriteEngine On
  RewriteCond %{REQUEST_URI}  ^/socket.io            [NC]
  RewriteCond %{QUERY_STRING} transport=websocket    [NC]
  RewriteRule /(.*)           ws://localhost:3000/$1 [P,L]
</VirtualHost>

After restarting Apache you should be able to successfully access your app using your domain address http://theproject.com.

This configuration also supports socket.io in case you may use web sockets with your application, which is very common with Node apps.

Sample Single Page Application (SPA) using Laravel 5 & Vue2 + Vuex + Vue-Router

Not to long ago I implemented a sample Single Page Application using Laravel 5 and Vue2 + Vuex + Vue-Router.

Today I decided to make it public and share my experience with others.

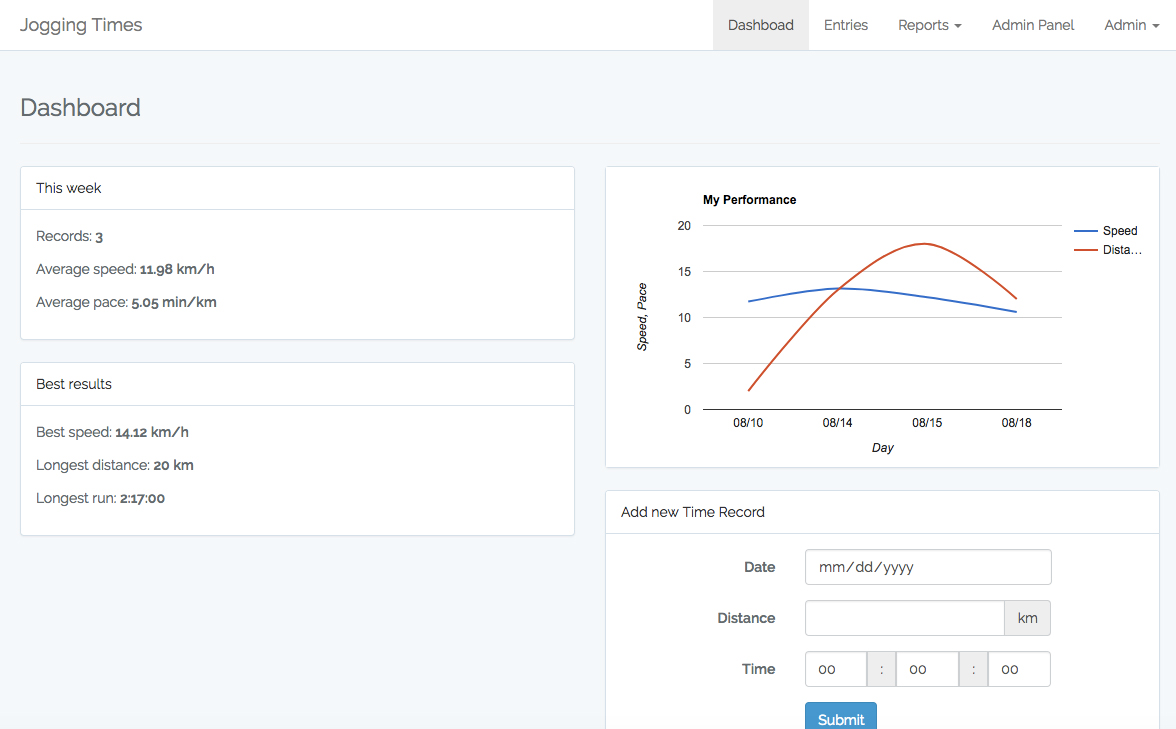
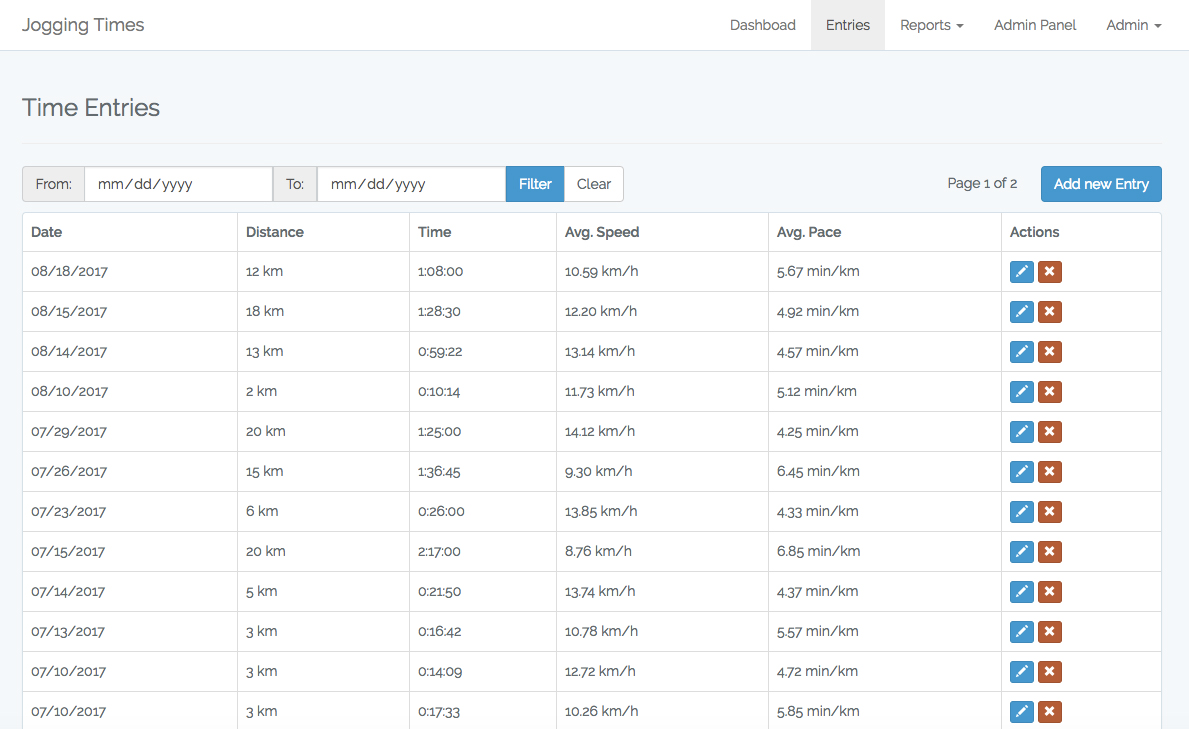
The project is basically a simple Running Tracker, where you can add your running entries and see your performance during some period of time.

Main features

  • Fully separate Backend and Frontend
  • Authentication based on Laravel Passport
  • List pages with filters and CRUD editing
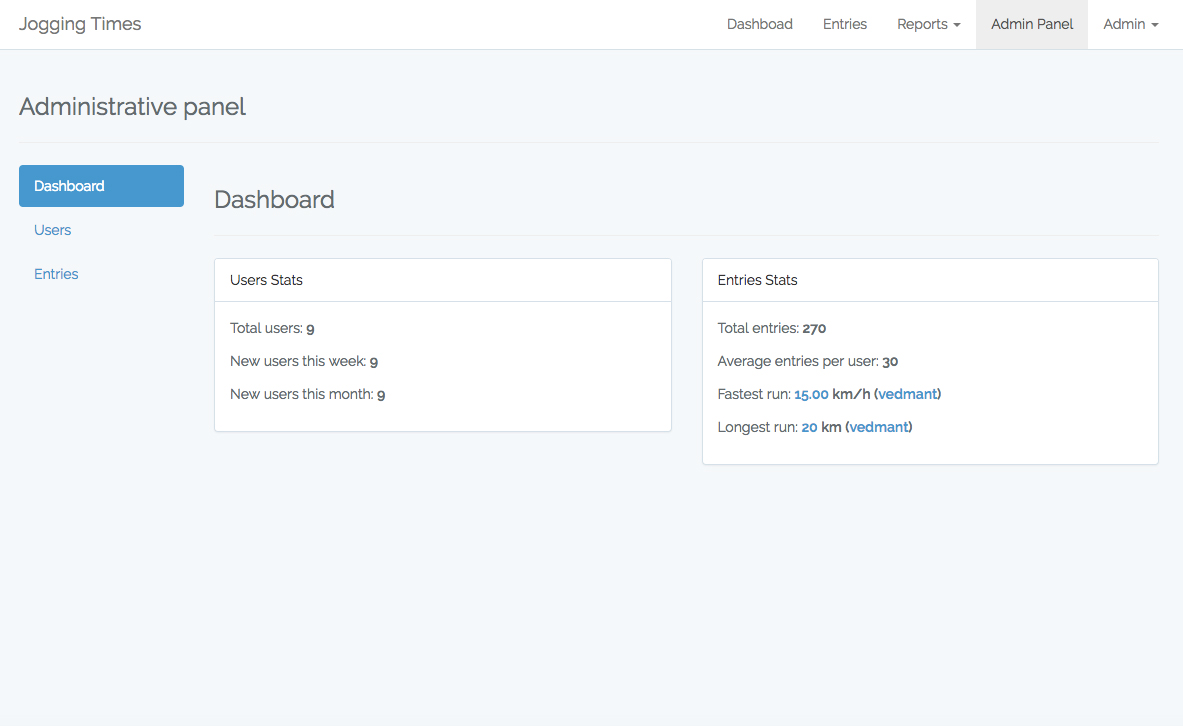
  • Admin panel
  • Simple widgets
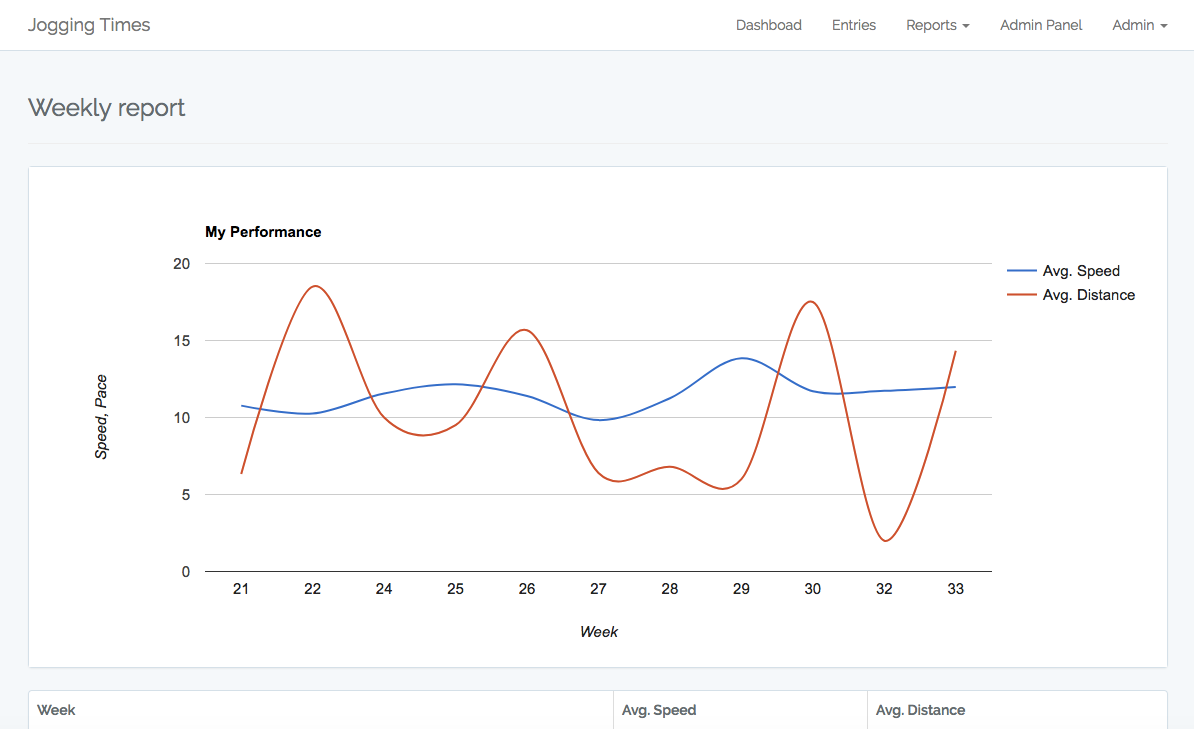
  • Simple reports
  • Full Phpunit test coverage
  • Sample E2E tests using Nightwatch and Cypress

Includes

Other Features

  • Front page
  • Authentication (registration, login, logout, throttle)
  • Users roles: administrator (all access), manager (manage records)
  • User dashborad with widgets and charts
  • Entries list with filter by date (list, show, edit, delete, create)
  • Report page with chart
  • User profile page
  • Admin dashboard with widgets
  • Users admin (list, show, edit, delete, create)
  • Entries admin (list, show, edit, delete, create)
  • Global loader for all requests with small delay

GitHub Link

Demo

Use login: [email protected] and password: 123456

This project is fully free to use for any purpose and licenced under MIT License.

Testing emails with Laravel

Reliability of emails subsystem is essential for current web applications, but testing emails is not as easy at it looks at first glance. Laravel doesn’t provide a good solution for testing emails out of the box, so after a bit of Googling I come up with following solution for testing emails.

Helper

Basic idea is build on attaching event listener to Swift emails package, for this I extended base class Swift_Events_EventListener that takes as parameter our test case.

/**
 * Class TestingMailEventListener
 *
 * @package Tests
 */
class TestingMailEventListener implements Swift_Events_EventListener
{
    protected $test;

    /**
     * TestingMailEventListener constructor.
     *
     * @param $test
     */
    public function __construct($test)
    {
        $this->test = $test;
    }

    /**
     * Before email sent
     * 
     * @param Swift_Events_SendEvent $event
     */
    public function beforeSendPerformed(Swift_Events_SendEvent $event)
    {
        $this->test->addEmail($event->getMessage());
    }
}

Then I created a Trait with following method:

/**
 * Trait TracksEmails
 *
 * @package Tests
 */
trait TracksEmails
{
    /**
     * Delivered emails.
     * @var array
     */
    protected $emails = [];

    /**
     * Register a listener for new emails.
     *
     * @before
     */
    public function setUpMailTracking()
    {
        Mail::getSwiftMailer()
            ->registerPlugin(new TestingMailEventListener($this));
    }
...

Which registers event listener and collects all emails sent with Swift.

Having this done it’s easy to check whether particular email was sent, I also added bunch of helpers to make it easier:

/**
 * Assert that at least one email was sent.
 * @return $this
 */
protected function seeEmailWasSent()

/**
 * Assert that the given number of emails were sent.
 *
 * @param integer $count
 * @return $this
 */
protected function seeEmailsSent($count)

/**
 * Assert that the last email's body contains the given text.
 *
 * @param string $excerpt
 * @param Swift_Mime_Message $message
 * @return $this
 */
protected function seeEmailContains($excerpt, Swift_Mime_Message $message = null)
...

And several more.

Here you can see full helper trait code click.

Usage

Usage of this helper is quite simple, here is simple example:

public function testEmail()
{
    \Mail::raw('Some content', function (Message $message) {
        $message->from('[email protected]', 'Laravel');
        $message->to('[email protected]');
    });

    $this->seeEmailWasSent()
        ->seeEmailTo('[email protected]')
        ->seeEmailContains('Some content');
}

And a bit more complex example of how I test my password reset form:

public function testPasswordReset()
{
    $user = $this->makeUser();

    Event::listen(NotificationSent::class, function (NotificationSent $notification) use ($user) {
        self::$token = $notification->notification->token;
        $this->seeEmailWasSent()
            ->seeEmailTo($user->Login)
            ->seeEmailContains(self::$token);
    });

    $this->visitRoute('password.request')
        ->assertResponseOk()
        ->type($user->Login, 'email')
        ->press('Reset')
        ->assertResponseOk()
        ->see(trans('passwords.sent'))
        ->seeInDatabase('password_resets', ['email' => $user->Login]);

    $this->visitRoute('password.reset', ['token' => self::$token])
        ->assertResponseOk()
        ->type($user->Login, 'email')
        ->type('123123', 'password')
        ->type('123123', 'password_confirmation')
        ->press('Reset Password')
        ->assertResponseOk()
        ->seeRouteIs('dashboard');

    $this->assertTrue($this->isAuthenticated());

    $this->assertTrue(app('hash')->check('123123', $user->fresh()->Password));
}

In this example I used events listener to listen for notification to check if sent token is the correct one.

Currently there are some probably better alternatives for testing emails with Laravel, like this one tightenco/mailthief.

Why JavaScript “++[[]][+[]]+[+[]]” expression returns string “10”

Recently I came over quite interesting expressions ++[[]][+[]]+[+[]] and if you open browser JavaScript console and paste it there it will return string “10”, but how it really works?

This is something that took my mind yesterday and I decided to make it clear for me:

  1. Firstly, +[] in JavaScript is the same as +"" which casts a value to number 0, which is used twice, so if we replace it, we can now see following:
    ++[[]][0]+[0]
    

  2. Now we can split it to two three separate expressions:

    ++ // Increment operator
    [[]][0] // Which returns [], that casts to 0 and then incremented to 1 (++ always returns a number)
    +[0] // Which returns 0
    

  3. [[]][0] means we get the first element from array [[]] which has one element that’s empty array and then increment it by 1, let’s write it in JS:

    [[]][0] // [], or
    [[]].pop() // []
    

  4. Getting 1 from ++[[]][0], as we figured out [[]][0] basically means just empty array or, [], then we have [] + 1 which returns string “1”, and due to ++ always returns number, we have just number 1:

    ++[[]][0] // 1
    ++[[]][0] === +([] + 1) // true
    +([] + 1) === 1 // true
    

  5. And the last part + [0], when we add array to anything in JavaScript, it will concatenate it to string of values with commas:

    0 + [0, 1, 2, 3] // "00,1,2,3"
    [1,2] + [3,4] // "1,23,4"
    
    // Or in our case
    1 + [0] // "10" - Yay!
    

To sum it up, lets describe it in single place:

++ // Increment result of next expression, or make number 1
    [
        [] // Array with single empty array item
    ]
    [ // Use bracket expression to access 0 element of previous array, which is empty array "[]"
        +[] // Cast array to 0
    ]

+ // Unary + Operator, or 1 + [0]

[ // Array with one element of number 0
    +[] // Cast array to 0
]

Simple MySql daily and weekly backups on Linux

Recently I had a task to create automatic Mysql database backups daily and weekly and keep some number of those backups.

After some short googling I come up with a quite small and simple shell script that just works.

To make this happen we need few following steps:

  1. Create a new file in /etc/cron.daily/ folder with execute permission, supposed we switched to root user already
    touch /etc/cron.daily/db-backup-mydb
    chmod 700 /etc/cron.daily/db-backup-mydb
    vim /etc/cron.daily/db-backup-mydb
    

    I used 700 permission so only root user can read the file, cause it will store password to our database

  2. Press key “i” and paste the following code:

    #!/bin/sh
    
    # Setup some variables
    backupfolder="/home/myapp/backup"
    user="user"
    prefix="db_daily_"
    now="$(date +'%Y%m%d-%H%M%S')"
    filename="$prefix$now.sql.gz"
    database="mydb"
    db_user="mydbuser"
    password="mypass"
    
    fullpathbackupfile="$backupfolder/$filename"
    logfile="$backupfolder/"backup_log_"$(date +'%Y_%m')".txt
    
    # Do a backup
    echo "mysqldump started at $(date +'%Y-%m-%d %H:%M:%S')" >> "$logfile"
    mysqldump --user=$db_user --password=$password --default-character-set=utf8 --single-transaction $database | gzip > "$fullpathbackupfile"
    echo "mysqldump finished at $(date +'%Y-%m-%d %H:%M:%S')" >> "$logfile"
    
    # Change file permission
    chown $user:$user "$fullpathbackupfile"
    chown $user:$user "$logfile"
    echo "file permission changed" >> "$logfile"
    
    # Delete backup files older than 8 days
    find "$backupfolder" -name $prefix* -mtime +8 -exec rm {} \;
    echo "old files deleted" >> "$logfile"
    echo "operation finished at $(date +'%Y-%m-%d %H:%M:%S')" >> "$logfile"
    echo "*****************" >> "$logfile"
    
    exit 0
    

    Also edit variables you need and replace database credentials at line starting with mysqldump after it press “Esc”.

  3. Then save the file by pressing “:” (colon), then “wq” and press enter.

  4. Run it to rest that it creates backups successfully:

    /etc/cron.daily/db-backup-mydb
    

    When you open your /home/myapp/backups folder you will see sql.gz backup file and a log file with debug information about backup process.

To make weekly backups the only few things you need to change is to place the script into /etc/cron.weekly/ folder, replace filename part “daily” to “weekly” and change “-mtime +8” to “-mtime +56” to keep last 8 weekly backups.

MS SQL on Vagrant Ubuntu Homestead box for development on Laravel

Hi everyone!

Recently I had a chance to setup and successfully run development environment with Microsoft SQL Server on Laravel’s Homestead Vagrant box. I used Homestead installation per project. And here is how I’ve done it.

Prepare Homestead box

First step is to install Homestead for a project:

composer require laravel/homestead --dev
php vendor/bin/homestead make

Then you need to change Homestead.yaml file.

Firstly, memory limit have to be changed to 4096: memory: 4096

Then hostname: hostname: mysite.dev

And probably name for convenience: ‘name: mysite.dev’

In sites section make sure that you have configuration like this:

sites:
    - map: mysite.dev
      to: "/home/vagrant/project/public"

Then download and install Vagrant box

vagrant up

And add to hosts file domain for a this box 192.168.10.10 mysite.dev.

Install, setup and import database

To setup database login to Vagrant box

vagrant ssh

Install MS SQL server and tools:

curl https://packages.microsoft.com/keys/microsoft.asc | sudo apt-key add -
curl https://packages.microsoft.com/config/ubuntu/16.04/mssql-server.list | sudo tee /etc/apt/sources.list.d/mssql-server.list
curl https://packages.microsoft.com/keys/microsoft.asc | sudo apt-key add -
curl https://packages.microsoft.com/config/ubuntu/16.04/prod.list | sudo tee /etc/apt/sources.list.d/msprod.list

sudo apt-get update
sudo apt-get install -y mssql-server
sudo apt-get install -y mssql-tools unixodbc-dev

sudo ln -sfn /opt/mssql-tools/bin/sqlcmd-13.0.1.0 /usr/bin/sqlcmd
sudo ln -sfn /opt/mssql-tools/bin/bcp-13.0.1.0 /usr/bin/bcp

Then run initial MS SQL setup script

sudo /opt/mssql/bin/mssql-conf setup

Use password “Secret123”, start server and enable starting on boot

Then it will require to install Sybase php extension

sudo apt-get install -y php7.1-sybase

When it will be updating some packages, select to keep the local version of config files on prompts.

To connect your Laravel application to MS SQL server you may need to add following configuration to your config/database.php file to connections section:

'sqlsrv' => [
    'driver' => 'sqlsrv',
    'host' => env('DB_HOST', 'localhost'),
    'database' => env('DB_DATABASE', 'forge'),
    'username' => env('DB_USERNAME', 'sa'),
    'password' => env('DB_PASSWORD', ''),
    'charset' => 'utf8',
    'prefix' => '',
],

After this application should be able to successfully connect to MS Sql server.

To import database, copy database *.BAK files to project folder, open sqlcmd console

sqlcmd -U sa -P 'Secret123'

and run following queries to import MYDB.BAK database backup file

RESTORE DATABASE [mydb] FROM DISK='/home/vagrant/project/MYDB.BAK'
WITH  FILE = 1,  
MOVE N'MYDB_dat' TO N'/var/opt/mssql/data/mydb.mdf',
MOVE N'MYDB_log' TO N'/var/opt/mssql/data/mydb.ldf',
NOUNLOAD,  REPLACE,  STATS = 1
GO

That’s basically all to install and run MS SQL on your Homestead Vagrant box, if you have any questions, feel free to contact!

Facebook Graph API – upload photo using JavaScript from local computer

Hi everyone, recently I encountered a problem with uploading photos to Facebook using Graph API with JavaScript. And there were no working solutions on Stack Overflow nor some example in official Facebook documentation.

So I have to figure out something, and here is how I do it:


$('#button_upload').click(function (e) {
   e.preventDefault();

    // Get file object from file input
    var file = $('#input_file')[0].files[0];

    // If file is selected
    if (file) {
        // We will use FileReader
        var reader = new FileReader();
        // And and onload callback when file data loaded
        reader.onload = function (e) {
            // This is array buffer of the file
            var arrayBuffer = e.target.result;
            // And blob object of the file
            var blob = new Blob([arrayBuffer], { type: file.type });

            // We will use FormData object to create multipart/form request
            var data = new FormData();
            data.append('access_token', FB.getAccessToken());
            data.append('source', blob);
            data.append('message', $('#input_description').val());

            $('#uploading').show();

            // Send the request manually with jQeury
            $.ajax({
                url: 'https://graph.facebook.com/me/photos?access_token=' + FB.getAccessToken(),
                type: 'POST',
                data: data,
                processData: false,
                contentType: false,
                cache: false,
                success:function (data) {
                    $('#status').append('<p>Photo was successfully uploaded, object id is: ' + data.id + '</p>');
                    console.log(data)
                },
                error:function (data) {
                    console.log(data);
                },
                complete: function () {
                    $('#uploading').hide();
                }
            });

        };
        // Read file as array buffer to create blob object
        reader.readAsArrayBuffer(file);
    }
});

Try out this working example facebook-upload-photos you will need to use test user “[email protected]” and password “123Qweasd”.

Notes: to upload photos you will need to create a facebook application with permission “publish_actions” and “user_photos”.